
Dolls' House Parade |
"Everything For Your Dolls' House Under One Roof" |
Tel: +44 (0)20 8295 0688 |
![]()
Hints & Tips - Making Food
| Whilst dolls cannot actually eat, there is nevertheless a huge range of wonderful looking food, which can grace the kitchens and tables of your dolls house. Whilst our suppliers have had years of practice to perfect their skills some items are not too difficult to make. With the aid of Rose - one of our long-standing suppliers - we are going to show you how to make a few of these goodies. For this article we have used Fimo modelling clay but other modelling
clays can be used such as Premo Sculpey. The primary colours may
vary between the different brands but by mixing colours together
you can create any shade that is required. Baking times vary (usually
about 30 minutes) but it is always best to follow the manufacturers
instructions Roast Beef Platter
Rose's Tip: First of all, select your platter. This is important as the platter will not only guide you as to the space you have available for the various items but also will give you a guide to scale. Roast Beef Firstly make a sausage shape (about 10mm diameter) out of light brown clay. Into the brown you should mix in a small amount of crumbled white (by rubbing between your fingers). This creates the fat within the beef joint. Next roll out a piece of white clay large enough to wrap around your joint and then fold around the brown. Rose's Tip: A pencil makes a very good rolling pin Now score lines in the meat using a sharp craft knife. For added texture press the surface with a file or a foil ball (see below) to create small dimples. Rose's Tip: If you screw up a piece of tin foil into a ball this can be used to press in a great texture to your creations Your roast beef joint is now ready for cooking. Roast Potatoes Make small balls with white clay - cut in half and put with the beef ready for cooking. Brussels Sprouts Make small balls with green clay and use a file or foil ball to press on a textured pattern. Carrots Firstly you need to make a long roll shape (approx 5mm thick) using yellow and orange clay in layers. Start with yellow and finish with the orange - only using small amounts of the yellow. Leave in a long roll ready for baking. Yorkshire Puddings Make a small ball of champagne (very light yellow) coloured clay. Then take a biro pen or a small piece of doweling and press into your ball to create the hole in the pudding. Rose's Tip: Cover the pen or doweling with talcum powder - this stops the clay sticking to it. This tip applies to any implements or tools, which you use with the clay. All your food can now be baked - following the manufacturers instructions for the material you are using. Leave everything to cool properly apart from your "carrot roll". This should be sliced while still warm (because it is easier to work with than when it is cold and set hard) to create the slices of carrot for your platter. Rose's Tip: It is always best to cut, shape and trim your creations whilst still warm (not hot). At this point the clay will still be pliable whereas when it has cooled totally it is quite hard and brittle to cut. Once the clay has cooled down totally the potatoes and beef can now be painted to give them the "browned" cooked look. For this we recommend using a brown Humbrol paint (No. 6) mixed with turpentine to make a fairly weak "wash". Apply with a brush but making sure the brush is quite dry, as you only want a fairly light colouring. Finally arrange your joint surrounded by the vegetables and puddings and glue to the platter - we recommend Tacky Glue or Tacky wax for a less permanent solution - add a piece of lichen (for your parsley dressing), which nicely rounds it off and your platter is now ready to be served. Fruit Cake Select your plate (remember this helps you with the scale). If you want a doily a good tip is to use a normal sized doily and cut out one of the shapes from within it and this makes a great, 1/12th scale version for your plate. Mix together half white and half champagne clay to get a beige colour. Roll it into a cake shape and use the plate to help get the correct size. Now take three pieces of clay - black, dark brown and red. Roll them flat and using a cocktail stick pick up tiny pieces from each and push them randomly into the cake. This is your fruit. Use a silver foil ball to press a dimpled pattern onto the top of the cake and the cake is now ready to be baked. Once the cake has cooled down completely it can be painted with a brown Humbrol paint (No. 6) mixed with turpentine to make a fairly weak "wash". Apply with a brush but making sure the brush is quite dry, as you only want a fairly light colouring. Put more colour on the top - as this is the part that browns more on a real cake. Cheese BoardFirstly select or make the board itself. This should be about 40mm x 30mm in size. It is best to create a variety of colours and shapes for your cheese board to make it look interesting. So here are a few suggestions. Edam
Stilton Take a piece of white clay and then roll out a very thin string of blue. Mould the blue into the white with your fingers to create the veins. Now roll out the clay into the desired shape and rough the outside using either some course sandpaper or your ball of silver foil. Cheddar Mix half white and half yellow clay and shape into a wedge Leicestershire Create a round shape out of orange clay Gouda Use a dark yellow clay and shape into a round cake shape. Then push holes into it using a matchstick. Of course there are thousands of different cheeses and they come in a great variety of colours and shapes - so why not experiment to include your own favourite selection or choose those which will brighten up your cheese board the best. Grapes All good cheese boards have a bunch of grapes and they are easy to make. Create small round balls in green clay mixed with a very small amount of white or transparent. Next roll out a tiny strip of green and simply attach your grapes to this "stem" These can all now be baked. When they come out of the oven allow to cool a little but while still warm cut out wedges or other shapes to represent the individual portions. Your cheese does not need painting but you can apply a varnish coat Rose's Tip: All your food creations can be varnished. This creates a gloss or a glaze, which on some items will give a cooked look. More importantly it will also protect the colour - by sealing it in. It is always easier to use a water based varnish as this will not require lengthy brush cleaning. Arrange on the board and glue in position as required - we recommend Tacky Glue or Tacky wax for a less permanent solution. FruitOranges
Rose's Tip: Select your plate first to help you with the scale Apples Mould some small green balls and leave with a smooth 'surface. Follow the instructions above for the stalk. Pears Use a light green clay or a white / green mix. Then mix in a tiny part of yellow to get the right shade. Mould into a cone shape and the stalk (see above) should be inserted in the thinner end. Bananas Use yellow or golden yellow clay and roll out into a long thin shape. Cut 4 pieces (about 15mm long). Squeeze them into a point at each end and then pinch all 4 together at the top to create the bunch. Now bend into a slight curved shape. Plums Use red and black clay to make tiny balls and add a stalk if required (see above). Then make the shapes slightly oblong. Strawberries Use red clay and mould into tiny cone shapes then use a file to create the textured look. Grapes Create small round balls in green clay mixed with a very small amount of white or transparent. Next roll out a tiny strip of green and simply attach your grapes to this "stem" Your fruit can now be baked remembering to allow them to cool fully before applying varnish. Also don't forget to make your stalk marks if required. You can also put a dark brown mark on the tops of the bananas for a touch of added realism. I hope this feature has been interesting and maybe revealed some useful tips. The important thing with making food is to experiment with the clays, i.e. with mixing colours and the different effects, which can be achieved from paint and varnish. Always remember - experimentation is cheap and will lead to better results as you become more practised. All you require is a little patience. If you have any queries that have not been answered by this feature please contact us on Tel: 020 8295 0688 or Fax: 020 8295 1061 e-mail: info@dhpf.co.uk We will do our best to answer your questions with the help of
our own expert - Rose.
|
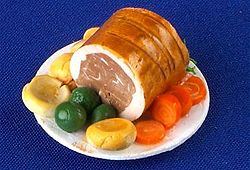 This
piece will consist of a roast beef joint, roast potatoes, Brussels
sprouts, carrots, and Yorkshire puddings.
This
piece will consist of a roast beef joint, roast potatoes, Brussels
sprouts, carrots, and Yorkshire puddings.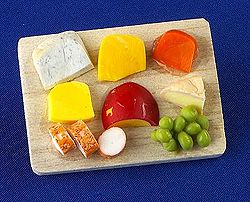 Take
a small piece of golden yellow clay and roll into a ball. Roll
out a piece of red into a long thin strip and wrap this around
the ball to create the rind of the cheese.
Take
a small piece of golden yellow clay and roll into a ball. Roll
out a piece of red into a long thin strip and wrap this around
the ball to create the rind of the cheese.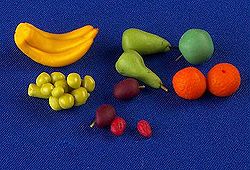 Make
small orange balls. Use a file to get the dimpled texture and
make a small indent with a cocktail stick for the stalk point.
If you want a stalk insert it now (i.e. a small piece of dried
flower stem) or if not just add a dab of black or brown paint
after baking.
Make
small orange balls. Use a file to get the dimpled texture and
make a small indent with a cocktail stick for the stalk point.
If you want a stalk insert it now (i.e. a small piece of dried
flower stem) or if not just add a dab of black or brown paint
after baking.
![]()
![]()
![]()
|
![]()
The best form of advertising is by word of mouth. Read what people say about Dolls House Parade. |
![]()
![]()
![]()
![]()
![]()
![]()
![]()