
Dolls' House Parade |
"Everything For Your Dolls' House Under One Roof" |
Tel: +44 (0)20 8295 0688 |
![]()
Hints & Tips - Lighting
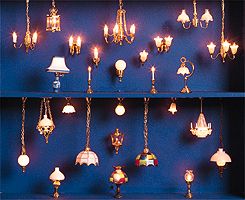
| This topic in the series is - Lighting. The first thing to point out is that fitting working lights into your dolls house is easier than most people think. Lighting will add warmth and feeling to your dolls house and give it a more realistic look.
Whilst there may be specific reasons where one would be used in preference to the other, we at Dolls House Parade will almost always recommend the use of the "twin wire" method. Furthermore, when we install lighting for our customers we always use this method. Because of this we feel more qualified to base this feature on the "twin wire" method rather than "copper tape". Why do we recommend the "twin wire" method over the "copper tape"?
Read all about it in our Lighting Instruction Booklet Twin Wire - How It Works The transformer plugs into the mains and the wires from this are attached to the power strip, which is normally attached to the back of the house. Most lights come with 24 inches (60cm) of wire with a plug on the end, which fits as standard into this system. Simply plug your light in to the power strip sockets (a standard power strip will have 12). So that you are able to test your lights you will need a transformer and power strip to get started, but other than that you need only buy a single light (or as many lights as you want).
Where possible it is always better to plan your lighting right at the outset of your dolls house project. The best time to prepare is when your house is still in kit form. Firstly you must decide upon the location of your lights and the routes the wires (on your lights) will take. Ideally, preparations should be made before other tasks such as wallpapering and flooring are undertaken. This will avoid causing damage to your decorations through installing the lighting later. Once these planning decisions have been made you are ready to go and buy some or all of your equipment. Because of the individual nature of "twin wire" the only necessary items required for you to begin are the transformer and power strip - and presumably at least one light. Now you must create the paths for your wiring. Dusty's Tip: It is much easier if this work (drilling holes and scoring grooves) can be done before the house is assembled. If you perform a dry run build (see Hints & Tips - External Decorating) it is quite easy to map out where the lights will go which will then enable you to drill and groove before assembling your house. If, for example you are fitting a ceiling light then you must decide on where you want to position it. Dusty's Tip: To find the centre of a room simply draw a diagonal line from one opposing corner to another and then repeat between the other two corners. Where the lines cross is the centre of the room. Ceiling Lights
Dusty's Tip: I would always recommend running wires across a floor rather than a ceiling because it is easier to hide wires under a floor covering rather than one for a ceiling. The holes should be drilled using a drill bit with a slightly greater diameter than the wire - remember the smaller the holes the neater the job. Wall Lights
Dusty's Tip: never bury the wires on a permanent basis with filler etc. - while the lights are usually reliable you may need to carry out maintenance or even replace at some time. Dusty's Tip: Never secure flooring permanently. If you are using carpet or flooring papers, attach these to a piece of thin card, i.e. from a cereal box. This can then be fixed in place by double sided tape - which can then easily be removed if required. However, if you are doing the work on a previously constructed house you must make the best use of the tools and space available
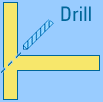
Again with the exit hole at the rear, the closer to the floor you drill the hole the neater the job will be, i.e. use the floor as the exit route by angling the drill - see diagram. Table Lamps
N.B. skirting boards may influence what is the best exit point for the wire. Lighting in Attic or Mansard Type Rooms For a flat roof house we would recommend the use of wall lights A sloped roof can accommodate ceiling lights. It is always best to use lights on a chain because the chain is not affected by the slope of the roof and therefore the light will hang correctly. A fixed light will poke out at an angle. Drill your hole out onto the back of the roof and then make a groove down the roof for your wire to lay in. Your roofing material will then hide the wire neatly. Dusty's Tip: Always make sure that no glue goes into the groove where it would fix the wire in position. You should always try to keep wires free to run - in case they ever need to be removed. Selection of Transformer To power your lights you will need a transformer and you should
get this before you install any lights (this will allow you to
test individual lights before installing them). Always remember the number of bulbs and not the number of lights determines the transformer power required. The normal rule of thumb is as follows:
You should bear in mind that a 6 room house with a single tulip lamp in each room adds up to 6 bulbs (and will only require a 1 amp transformer) however a 5 arm chandelier in each room totals 30 bulbs and therefore requires a transformer rated at 2 amps. Adding Glowell fires and possibly Xmas tree lights further increases the demand on the transformer. If you use a 2 amp transformer you should use 2 powerstrips and balance the bulb load evenly over the two. Clearly for a standard 6 room house with average lighting, a 1 or 2 amp transformer will be sufficient, however if further capacity is required, please call one of our shops and we can advise you. Now that the route has been prepared and the equipment bought you can install your light(s). Dusty's Tip: It is always best to test your lights before installing them to make sure they work - simply connect the transformer to the powerstrip and plug in the light. Dusty's Tip: If a light comes with a plug attached it is easily removable.
Once you have the wire routed through to the back of your house you can now refit the plug. This is done by first feeding the twin wire through the central hole in the plug. Then one wire is placed into each of the two holes on the other side of the plug - first ensuring that the end of the wire is bared to ensure a good contact. Push the brass pins back - one in each hole. Dusty's Tip: Always make sure there are no loose strands of wire poking out from the pins - you should not be able to see any bare wires - as this can lead to "shorting". Re-trim the wires if necessary. If you have laid the wire across the floor, whether in a groove or not, a piece of thin masking tape should be used to flatten and hold the wire into position. The wire is very thin and if you have chosen not to create grooves, a piece of masking tape will ensure the wire runs very flat against the floor and should prevent it from showing through your flooring. Now fix the light itself in place using Tacky Wax. Dusty's Tip: some lights have sticky adhesive pads - which we find do not secure the light for long. It is best to remove these - carefully as wires are soldered under the pad - and apply Tacky Wax. Dusty's Tip: we would never recommend using glue when securing your lights. Tacky wax will achieve a firm fixing but will still allow the light to be moved for maintenance purposes.
Hopefully your wires will reach the powerstrip, but if not extension leads are available and simple to fix. A final tip for tidying up the wires at the back of the house is to use masking tape to fix the wires neatly to the house. What to do if a light doesn't work Check that the powerstrip works. If the fuse has gone, the light on the powerstrip will be lit. If necessary replace the fuse (always use the fuse designed for the powerstrip). You can also test by plugging in a different light, preferably using the same socket. Check that the bulb(s) in the light are OK. Replace them to test
if necessary. Check that there are no breaks in the wire - although this will be very unusual unless you have accidentally cut through it while, for example cutting out some flooring. Conclusion This twin wire method is very easy to install and requires little or no maintenance. We also feel that once installed it is more resilient than copper tape and will give less problems in later years However for those still intent on using the copper tape system we have a booklet available for sale: "How to Electrify Using Copper Tape" Dusty's Tip: If using copper tape always use non toxic wallpaper pastes when papering - other pastes can cause a reaction with the copper which causes green staining If after reading these tips you are still unsure about lighting your house please contact us and we can give you further advice - or even install the lighting for you. N.B. This feature is based on the products we sell and the information given is based on those products. Where different items are used this information may not apply. Obviously space does not permit us to discuss all lighting topics,
however we have tried to cover the questions, which are asked
most frequently in our shops.
If you have any queries that have not been answered by this feature please contact us on Tel: 020 8295 0688 or Fax: 020 8295 1061 e-mail: info@dhpf.co.uk We will do our best to answer your questions with the help of our own expert builder Dave "Dusty" Caswell. If you need any more help or advice, or have any suggestions for topics you would like to see featured in the future, or you have your own hints and tips you would like to share with your fellow miniaturists, please e-mail us at:
|
 The
first thing to decide is what type of system you are going to
use. The two most common systems are:
The
first thing to decide is what type of system you are going to
use. The two most common systems are:
 Dusty's
Tip: It is OK to drill angled holes for your wires (i.e. when
using a large drill this may be easier) provided the angle is
in the direction of the wire run.
Dusty's
Tip: It is OK to drill angled holes for your wires (i.e. when
using a large drill this may be easier) provided the angle is
in the direction of the wire run. Most
lights come with a 24inch (60cms) length of wire with a plug attached.
The first step is to remove the plug, which can be done quite
easily. Simply pull out the 2 pins with a pair of tweezers or
small pliers. Do not pull the pins out with your teeth - as dental
bills can greatly increase the cost of your lighting. Then, holding
the plug, pull gently on the wire - this will remove the plug.
You can now feed the wire through the holes (in the ceiling and
rear wall) and if necessary lay it in the groove.
Most
lights come with a 24inch (60cms) length of wire with a plug attached.
The first step is to remove the plug, which can be done quite
easily. Simply pull out the 2 pins with a pair of tweezers or
small pliers. Do not pull the pins out with your teeth - as dental
bills can greatly increase the cost of your lighting. Then, holding
the plug, pull gently on the wire - this will remove the plug.
You can now feed the wire through the holes (in the ceiling and
rear wall) and if necessary lay it in the groove. You
are now ready to plug into the power strip and sit back and admire
your work.
You
are now ready to plug into the power strip and sit back and admire
your work.

![]()
![]()
![]()
|
![]()
The best form of advertising is by word of mouth. Read what people say about Dolls House Parade. |
![]()
![]()
![]()
![]()
![]()
![]()
![]()