
Dolls' House Parade |
"Everything For Your Dolls' House Under One Roof" |
Tel: +44 (0)20 8295 0688 |
![]()
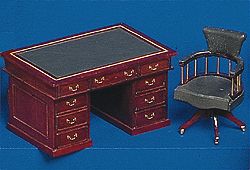
Hints & Tips - Furniture Finishing
Roy & Mary have kindly provided the guidance for this feature and agreed to pass on some of the secrets which they use in creating such sought after furniture pieces. The following information applies equally to hardwoods and softwoods Furniture Finishing can be split into the following stages:
Roy's Golden Rule ­ "the finish is only as good as the preparation" PreparationThe first thing which must be done is to fill in the grain on the wood. We would recommend Rustins Grain Filler (available at your local DIY store). This comes in various colours such as natural, oak and mahogany. It is obviously ideal to choose the colour that best matches the wood you are using and the finished colour you require. However, this is not vital as the colour can be altered later in the process. Roy's Tip: If you are building your furniture from scratch it is a good idea - and much easier - to fill the timber first, i.e. when it is in plank form. The filler is best applied with a lint free cloth. Always rub ACROSS the grain (not with it). This ensures that the filler goes deep into the wood.
Roy's Tip: Be patient - let it dry fully. Once it is dry the surface can be rubbed down - always with the grain - with a piece of silicone coated rubbing down paper (approximately 220 grit). Do not use glass paper or sandpaper, as this will leave a fine layer of residue on your work which is difficult to clean. Roy's Tip: The numbers on rubbing down paper work on the basis of the higher the number the smoother the paper (and the finish) - so 220 grit paper is used for preparation whereas 400 grit is finer and used for finishing. Continue to rub down until silky to the touch and then remove the dust. A tack cloth can be used after each sanding to remove dust. These can be purchased from Dolls House Parade or your local hardware store. Roy's Tip: To remove the dust use a vacuum cleaner with the brush attachment. Simply blowing it will not be good enough. Repeat the process if necessary until you are completely happy with the finish of the surface. Staining
Roy's Tip: An easy way to create your own "dust free workplace" Go to the bathroom and soak an old newspaper. Then lay the sheets out on the floor. Turn on the shower (on full hot) and shut the door and windows so that a good level of steam builds up. Then switch off the water and let the steam clear and as the steam particles sink to the floor (they are heavier than air) they will soak up dust and deposit it on the newspaper. You will then be left with a relatively dust free environment - ideal for staining and varnishing. Once again we would recommend another Rustins product - this time Rustins Spirit Stain. Various colours are available and can be bought at your local DIY store. Spirit stain should be used because it penetrates deeper into the timber and also dries quickly. Roy's Tip: Do not use water based stains as they will warp the timber and raise the grain of your wood. Mary's Tip: Stain should be applied with a good quality flat paint brush. The best type is an artist's brush and not a household or round child's brush. Always build up the colour with several thin coats of stain rather than fewer thick coats. This produces a better and more even finish. Wipe off any surplus stain between coats with a soft brush or tissue. Let each coat dry thoroughly before applying the next one. Roy's Tip: Be patient - let it dry fully. When you are applying stain it is difficult to cover the whole piece in one go because you must hold your item while you are working. The best way to deal with this problem - without leaving finger marks - is to divide your job into two. Stain half at a time. Wait until it dries then stain the other half. However, always complete a full coat, i.e. 2 halves, before starting the next, otherwise you will find it difficult to get a match over the whole item. Mary's Tip: Set yourself a routine. I always split my item into two as follows: firstly hold the sides and stain the top, bottom, back and inside; then hold the top and bottom and stain the sides. Two or three coats of stain should be sufficient. Roy's Tip: Be patient - let it dry. If the final coat does not dry before you begin the next stage you will move the stain. SealingWe would suggest using a small pot of modelling varnish, i.e. Humbrol, as your sealer. Either a satin or semi-matt finish will work well and give a clear finish. If you prefer - French polish can also be used (available from a DIY shop), but if this is used, remember your finish will be slightly darker than with the varnish. Both varnish and French polish can be applied with a clean soft brush. It is always better to use different brushes for each stage. However, if you are using the same brush it must be cleaned thoroughly each time. Lacquer can be used but is not recommended. This is because it dries too quickly and may lift the stain if not allowed to dry in the correct environment. The professionals use lacquer - but it does require the right, specialist tools and conditions. Once the piece has been allowed to dry properly the "nibs" must be rubbed down before applying the next coat. "What's a nib", I hear you cry. Well, a nib is a small particle of dust or an air bubble trapped in the varnish, which if left, will result in an uneven surface to your finish. Use a piece of 400 grit paper to rub down to a smooth finish. Once again use the vacuum cleaner to clear the dust. FinishYou are now nearly there!
Roy's Tip: Don't forget it can take just as long to finish a piece of furniture as it does to make it. We hope this feature has been interesting and for those who make their own furniture pieces the tips will enable you to achieve better results from your work. For those who prefer to buy their furniture maybe next time you look at a piece of Roy's work (or that of any other craftsman) you will now appreciate the amount of skill and work that goes into creating the finished article. Don't forget - the work of Roy and Mary can be seen in our shops and if you have any queries that have not been answered by this feature please contact us on Tel: 020 8295 0688 or Fax: 020 8295 1061 e-mail: info@dhpf.co.uk
If you need any more help or advice, or have any suggestions for topics you would like to see featured in the future, or you have your own hints and tips you would like to share with your fellow miniaturists, please e-mail us at:
|
 For
this feature we have enlisted the help of two of the oldest (that's
in time we have been friends and not age) friends of Dolls House
Parade - Roy & Mary Sherwood. Roy has been making fine English
furniture for a good many years and - believe it or not - was
the very first supplier to be "signed up" for her new
venture when Lyn opened Dolls House Parade in 1992. Not a bad
way to start off - with one of the countries leading makers as
a supplier.
For
this feature we have enlisted the help of two of the oldest (that's
in time we have been friends and not age) friends of Dolls House
Parade - Roy & Mary Sherwood. Roy has been making fine English
furniture for a good many years and - believe it or not - was
the very first supplier to be "signed up" for her new
venture when Lyn opened Dolls House Parade in 1992. Not a bad
way to start off - with one of the countries leading makers as
a supplier.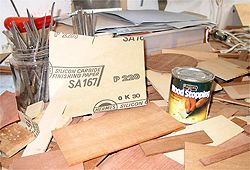 Leave
it until it becomes dry (it will have a powdery texture). The
drying time should be given on the tin of the product you are
using.
Leave
it until it becomes dry (it will have a powdery texture). The
drying time should be given on the tin of the product you are
using.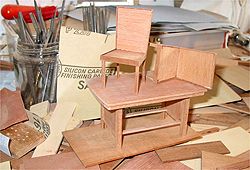 Now
you are ready to stain the wood. The stain and varnish should
be applied in an area, which is as dust free as possible. This
will reduce the amount of work you have to do
Now
you are ready to stain the wood. The stain and varnish should
be applied in an area, which is as dust free as possible. This
will reduce the amount of work you have to do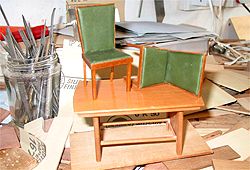 With
a soft (lint free) cloth apply a small amount of good quality,
wax furniture polish - not spray polish. Let it dry and buff it
up with a cloth. By applying further coats of polish the level
of gloss can be built up as required.
With
a soft (lint free) cloth apply a small amount of good quality,
wax furniture polish - not spray polish. Let it dry and buff it
up with a cloth. By applying further coats of polish the level
of gloss can be built up as required.

![]()
![]()
![]()
|
![]()
The best form of advertising is by word of mouth. Read what people say about Dolls House Parade. |
![]()
![]()
![]()
![]()
![]()
![]()
![]()