For this feature we are going to
explain how to dress a doll. For most people the characters who
inhabit their dolls house will be bought as completed dolls -
but for those of you who would prefer to "do it yourself"
and create not only a unique doll, but also one which can be modelled
on a particular theme or person, we hope this information will
be of some help.
 For
this feature we have enlisted the help of another of Dolls House
Parades faithful friends - Jan Clarke. Jan began making dolls
in 1977 and her years of experience now make her one of the finest
doll makers in the world. She regularly shows at fairs such as
London, Kensington and Birmingham, Miniatura as well as occasional
shows in the USA. Through this exposure her dolls are now keenly
sought throughout the world. We are therefore very grateful that
she has now kindly agreed to share some of her secrets and experience
with you. For
this feature we have enlisted the help of another of Dolls House
Parades faithful friends - Jan Clarke. Jan began making dolls
in 1977 and her years of experience now make her one of the finest
doll makers in the world. She regularly shows at fairs such as
London, Kensington and Birmingham, Miniatura as well as occasional
shows in the USA. Through this exposure her dolls are now keenly
sought throughout the world. We are therefore very grateful that
she has now kindly agreed to share some of her secrets and experience
with you.
In order to follow these instructions you will either need to
purchase the pattern set (on which this article is based) from
Dolls House Parade - or you can use another pattern of your choice.
Either way, we hope that these tips and instructions will help
you to produce a better result.
There are three stages to dressing a doll.
- Underclothes
- Footwear
- Outer Garments
Underclothes
You will first need to buy the following material for the petticoat
and pantaloons. This must be thin material, which can be found
in most haberdashery shops.
Jan's Tip: I can recommend The Dolls
House Draper for materials.
1. 10ins x 8ins in fine cotton lawn or fine cotton
(approximately 22cms x 17cms)
2. 16" of thin 1/4" wide lace for trimming
(approximately 40cms x 0.5cm)
Using the material you have bought you can now begin.
Lay out the pattern for the underwear onto the material and cut
out around the shapes for the petticoat and the pantaloons.
Pantaloons
Fold right sides together on each leg and seam from bottom to
crutch of each leg. Next, seam down the back and front of the
pantaloons. Turn up the bottom of each leg to create a single
hem. Turn over and add lace flat onto the sides of each leg.
Each leg will now have a single piece of lace as trimming.
Turn inside out so that they are now round the right way - with
the seam on the inside and lace on the outside.
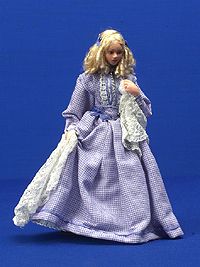
Petticoat
Take the petticoat pattern and remove from the cotton lawn. Place
the side seams together and stitch together at the back to make
a seam.
 Turn
up the hem, then turn inside out so that the seam is on the inside
and then add white lace around the bottom of the petticoat. Turn
up the hem, then turn inside out so that the seam is on the inside
and then add white lace around the bottom of the petticoat.
At the top edge of the petticoat run a small draw stitch through
the material.
Underwear can now be put on the doll - pantaloons first. Always
stitch to fit on the body of the doll and draw in the pull string.
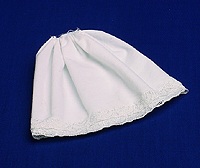
Footwear
Stockings
If your doll does not have painted shoes prior to putting on
the petticoat and pantaloons you must cover legs and feet in PVA
glue. Then take a small piece of stocking (use ordinary stocking
material).
Jan's Tip: Marks & Spencer sell
very fine cotton drawers and a pair of these will go a long way
as a material supply.
From the top of leg to the toe pull round your stocking until
the edges meet at the back. Keep pulling until the stocking follows
the shape of the leg with no wrinkles, then trim off the excess
from under the foot and up the back to leave a thin seam.
Boots
 To
make boots you will need some fine leather To
make boots you will need some fine leather
Jan's tip: Use an old pair of thin
gloves - you can often find these in your local charity shop.
Cut out a piece - approx 1" deep and 3" long, but check
that it fits around the leg
Cut the length (on the cross of the leather) in half, then spread
lots of PVA glue over the stocking covered leg - to the height
where you want the top of the boot. Fix the piece of leather from
the top down, to cover the ankles and foot and pull tight at the
back of the heel and under the foot. Trim off the excess.
For the soles cut out the shape from the leather and stick on
the bottom of the foot covering the rough edges.
Repeat for the other foot.
Outer Garments
Dress
The easiest way to make the dress is to create a skirt with added
bodice and sleeves and fix it permanently to the doll.
The best materials to use for the dress are fine cottons, silks,
taffeta and velvets. The trims must be fine and lightweight -
preferably cotton or silk. This will allow the skirt to hang properly.
Instructions will initially be the same as those for making the
petticoat but with more trim and elaboration / decoration as required.
Jan's Tip: Always use lightweight fine
trimmings
Take the dress pattern and lay on the material. Cut out around
the pattern and remove.
It is easier to put trim on the flat material and do the back
seam as the final job.
Place the side seams together and stitch together at the back
(remember to stitch on the inside) to make a seam. Again use a
tiny tacking drawstring through the top of the skirt. Put on the
doll and draw tight around the waist.
For the bodice of the dress iron your chosen material onto light-weight
Vilene.
Jan's Tip: Vilene can be bought from
Dolls House Draper or a dress shop
This increases the stiffness. If it is a light material use white
- if dark use black.
Pin the pattern for the bodice onto the material and cut out
the three shapes of material.
Then put the right sides together and stitch shoulders and side
seams together. Leave this as it is and put on the doll and pin
the material in to the right size to fit your doll's body.
You can also pin the darts of the bodice to fit the body of doll
and then turn in the back seam of bodice. Take off the doll and
stitch the darts and seams. Turn into the right way round and
put onto the doll - turning a tiny hem around waist.
Slip
stitch the back opening which is folded over so the bodice now
fits tightly onto the doll.
Cut out the sleeve patterns - fold over and stitch down the length.
Use small gather stitches at the top and cuff off at the sleeve.
Do the same for the other sleeve.
When completed put the sleeves on the doll's arms and pull the
gathering together at top to fit into the arm hole. Slip stitch
the sleeve top onto the bodice.
Pull tight the stitching around the bottom at the wrist. Stitch
to make secure with a small narrow piece of lace or ribbon over
raw edge of sleeve to make a cuff.
To finish - add lace trim around the neck covering the raw edge.
Trim the bodice as required using any form of trimming you desire.
A few suggestions would be - lace pannier - frills of lace - flat
ribbon from back waist to front waist over the shoulders finished
with tiny bows - picot braid - etc, etc.
If needed ribbon can be added round the waist with ether a bow
at the back or the front, or turned over the side with tiny bead
to make belt.
Jan's Tip: Remember at each stage from
the pattern you must iron your material.
Your doll should now be ready to grace your house.
If you have any queries that have not been answered by this feature
please contact us on
Tel: 020 8295 0688
or Fax: 020 8295 1061
e-mail: info@dhpf.co.uk
If you need any other help or advice, or have any suggestions
for topics you would like to see featured in the future, or you
have your own hints and tips you would like to share with your
fellow miniaturists, please e-mail us at:
enquiries@dhpf.co.uk
|